Written by Isaac Grossberg, Software Engineer
Introduction to FactoryTalk Optix Part 1
Welcome back to the second blog in our series on FactoryTalk Optix! If you missed the first post, where we covered the basics of FactoryTalk Optix and its core elements, you can read it here.
Today, I’m excited to share why I enjoy using Rockwell Automation’s FactoryTalk Optix platform for developing HMIs, particularly its support for the Object-Oriented Programming (OOP) paradigm when creating custom components. Let’s dive into why this approach is beneficial and how to leverage it in your projects.
What is Object Oriented Programming?
Object-Oriented Programming (OOP) is a software engineering paradigm designed to provide structure to large software projects, especially those developed simultaneously by many engineers. Though there’s no official standard for OOP, there are many online resources that explain its guiding principles.
The fundamental idea behind OOP is structuring code into objects that interact with each other. These objects are defined by classes, which act like templates that can be instantiated into specific objects with real data. In Optix, these templates are called Types. They allow you to define a component template that can be instantiated multiple times, with all instances sharing the same properties. The core concepts behind OOP are inheritance, encapsulation, abstraction, and polymorphism.
Inheritance
Inheritance allows a child class to be defined from a parent class, inheriting all its properties. A child class can add functionality or override base functionality. In Optix, once you have a user-defined type, you can create a child type from it that will inherit the parent’s properties. Changes to the parent’s properties will flow through to the child unless the child’s properties are modified directly.
Encapsulation
Encapsulation means grouping all the logic associated with an object together, making it easier to understand the object without searching through a project for various pieces. In Optix, this is achieved by having subcomponents, including UI and NetLogic, under the main container that defines the type. Variables used to control the type’s properties can be referenced relative to an alias on the parent.
Abstraction
Abstraction allows an object to be used in high-level logic without needing to understand its internal workings. In Optix, this is achieved with aliases. As long as the correct type of object is linked to the type’s alias, there’s no need to understand all the internal connections. This enables rapid development with pre-defined types, allowing users to build functional UIs quickly without delving into details.
Polymorphism
Polymorphism allows a child class to connect to the same interfaces defined for its parent class, enabling continuous development without breaking the existing architecture. In Optix, careful development of child types ensures they don’t deviate too much from the parent’s structure, maintaining ease of use while allowing for enhancements.
Example: Car Monitor
Let’s create a car monitor dashboard type in a fresh Optix project. First, create two new folders under UI and Model, both named Types. Optix will automatically convert anything added to the UI folder into types, but objects in the Model folder need to be converted manually.
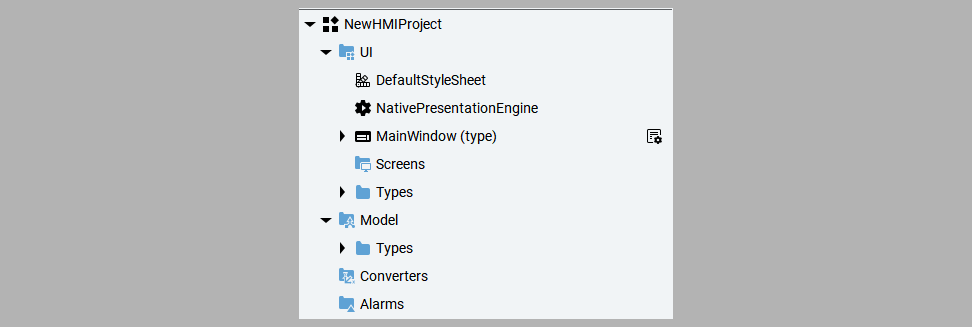
Next, a new panel container should be created under the UI > Types folder. This will serve as the base class from which other components are built.

Next, some basic UI components will be added to the class to help visualize the data for the car.
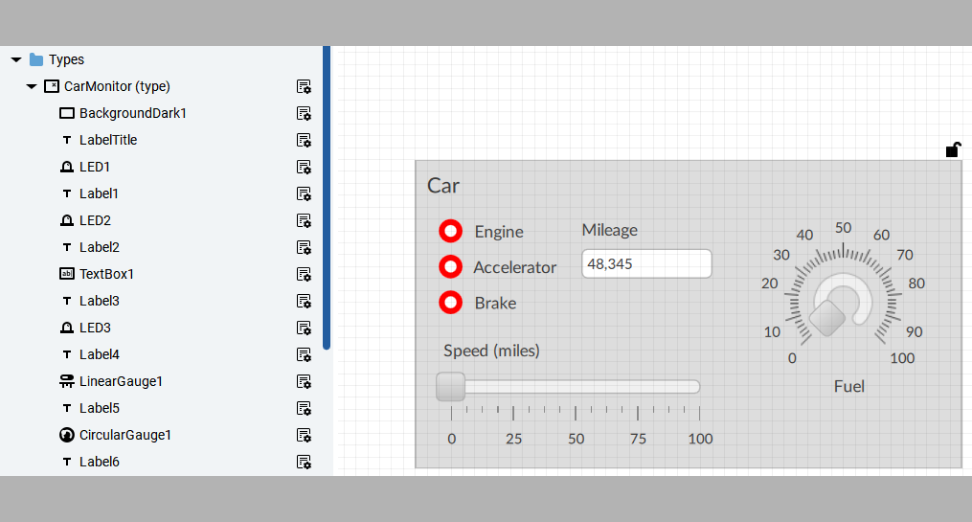
At this point, the UI is static, and the data needs to be populated by variables. To achieve this, a model variable is created under Model > Types to hold all of the data that will be visualized. It is important to note that the variable types match the UI that has been built (Booleans for LEDs, INTs for numeric values, Strings for text).


This object needs to be converted into a type. To accomplish this, it is refactored into a type. It is important to note that type names cannot be duplicated, so the CarMonitor object is renamed to CarMonitorObject.

Next, create an alias on the UI type that can be used to link to the object. Define the type of object that will be linked by dragging the CarMonitorObject (Type) onto the Kind property.
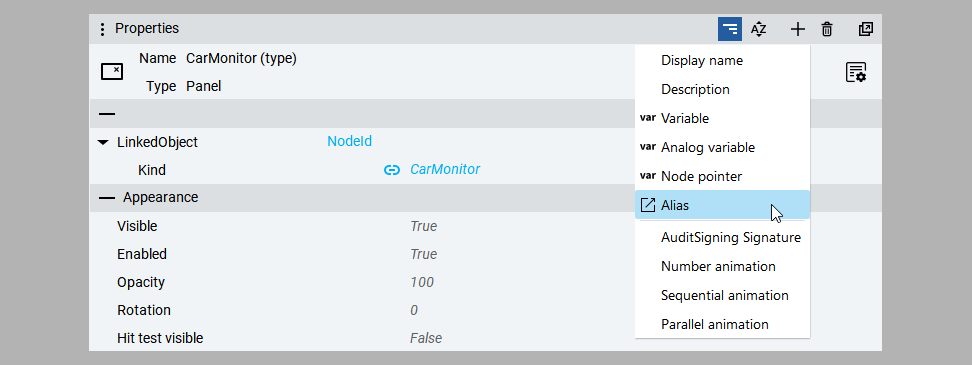
Now that the alias has been created and the Kind has been defined, begin creating dynamic links between the UI properties and the variables in the object. For each property, select Add Dynamic Link then navigate to the CarMonitor type under UI > Types and locate the property under the LinkedObject alias.
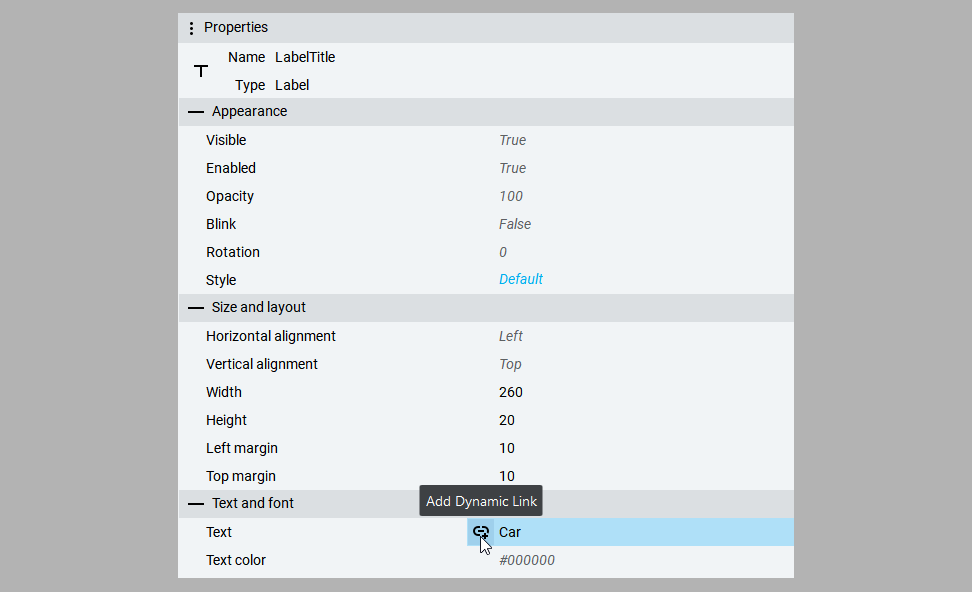

The link now appears as a relative reference to the LinkedObject on the parent container.

This process should be repeated for the rest of the UI components, and at this point, the first type will be complete. A place for it can now be created on the main screen. A HorizontalLayout container is used for this, ensuring that each card created is automatically placed side by side.
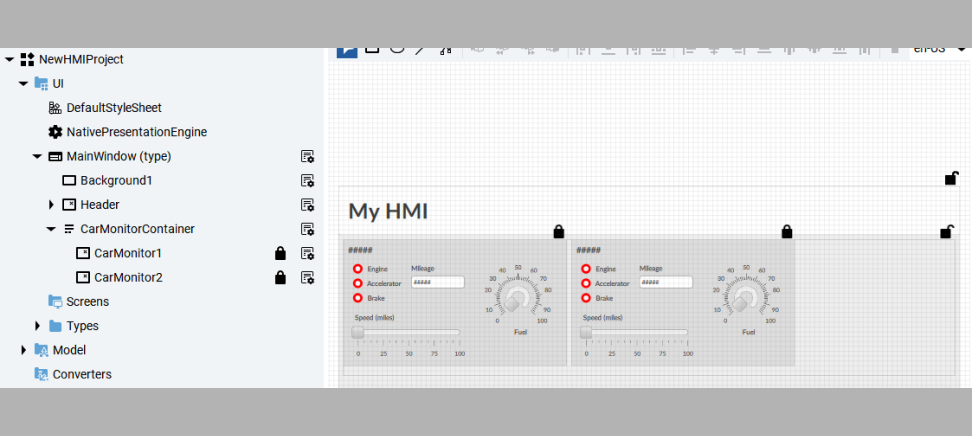
These UI type instances require corresponding object instances, so they are created under the Model folder.

Next, the objects are linked to the UI instances by dragging them onto the corresponding aliases.

Now, when the values in the objects are adjusted, the UI will reflect those new values during emulation.
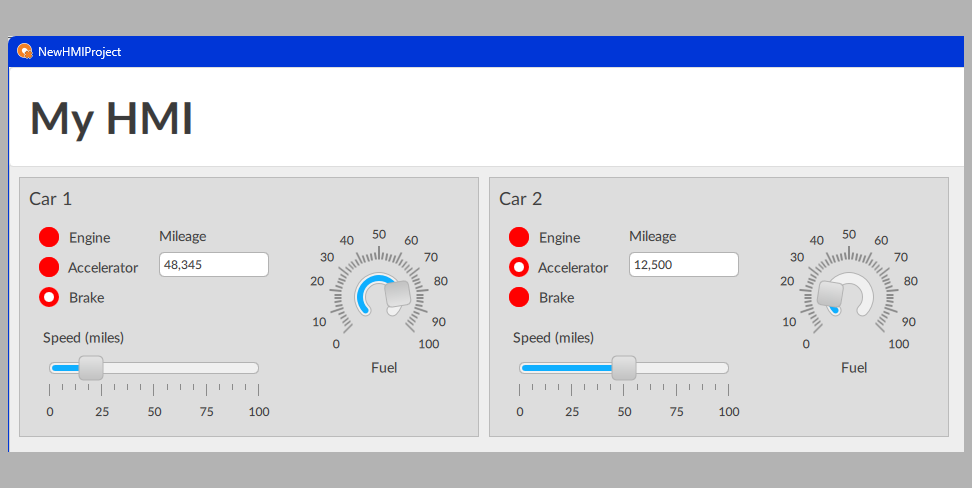
The advantage of defining these as types is that modifications to the parent will be reflected in the children. For example, if the top speed is modified, both instances will have the updated speed range.
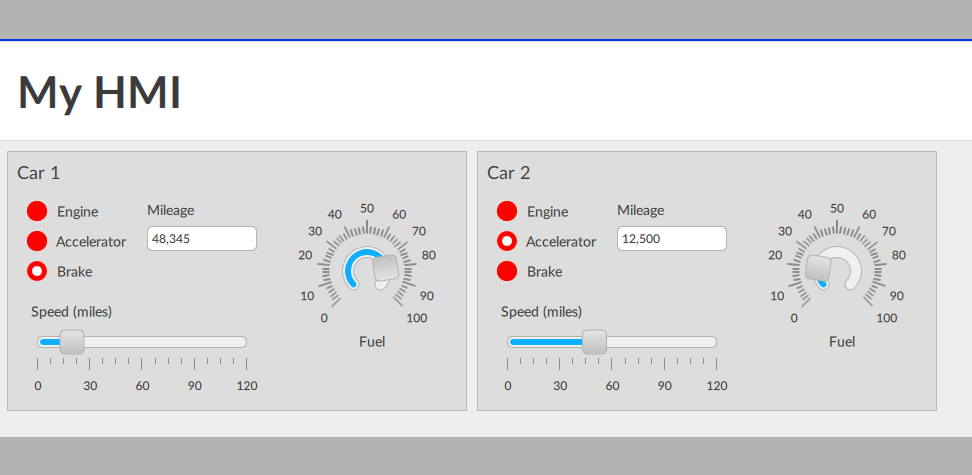
If the speed is modified directly on one of the instances, that change will persist even if the parent is updated again. The exciting part is that a new type of car can now be created that is similar to the first but includes additional properties. For example, a hybrid car monitor can be created, which will have all the same properties as the original car but with an additional Battery Charge property.
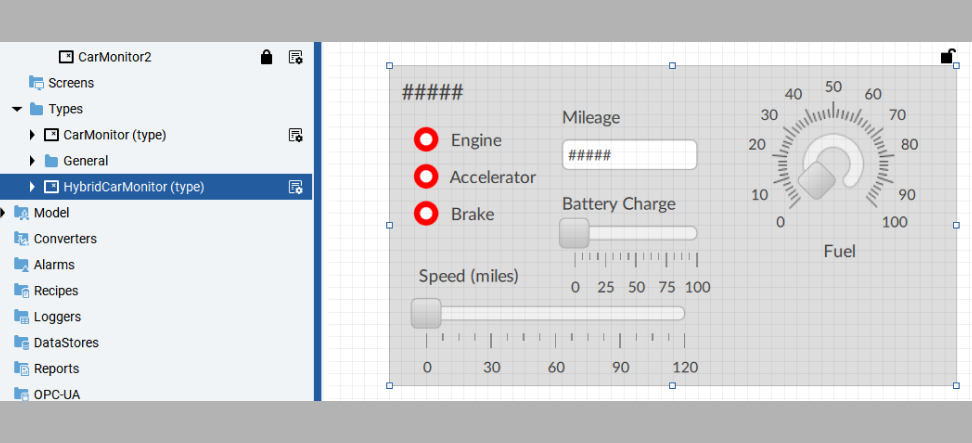
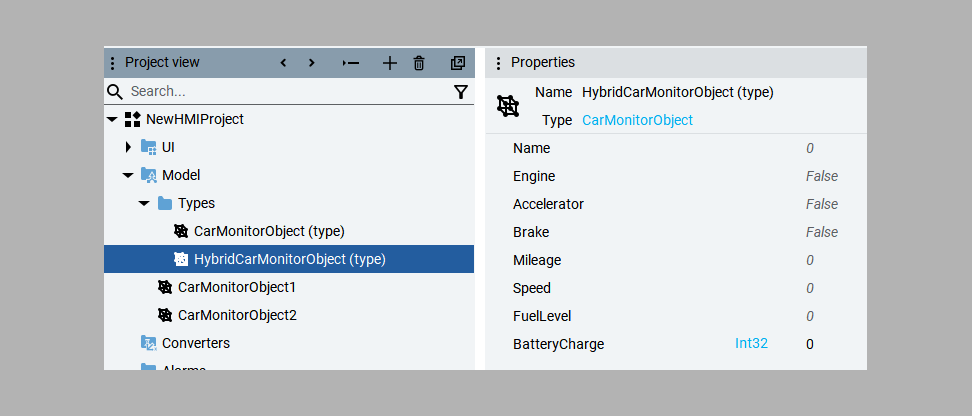
Follow the same process of creating instances of the UI and model objects for the hybrid car and add them to the main screen.
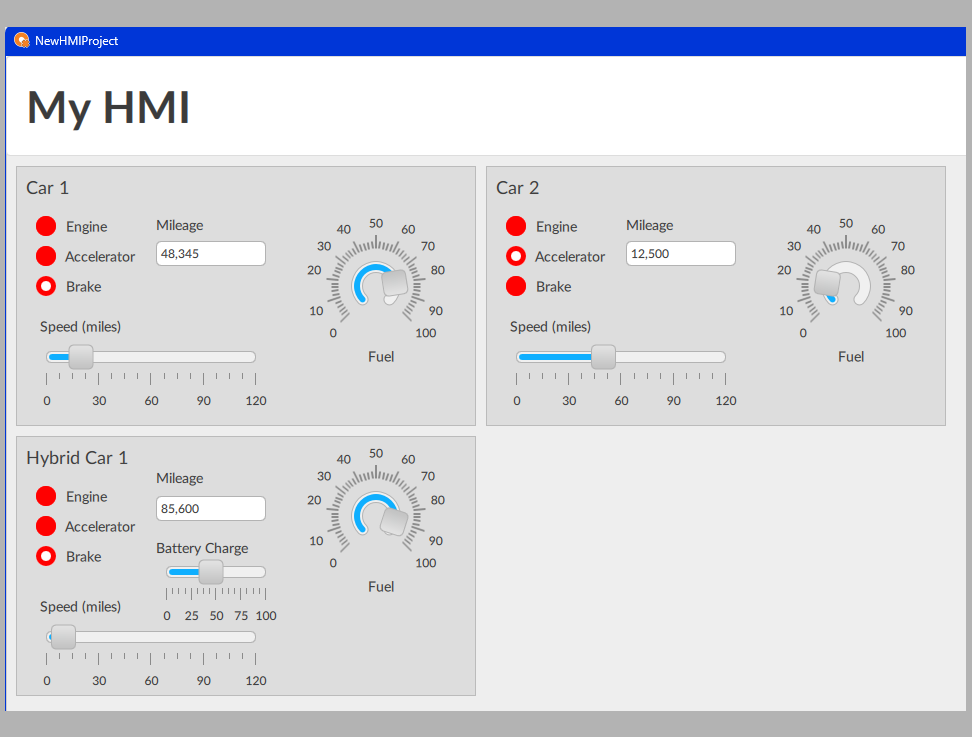
The hybrid car has inherited all of the properties from the base car type. It can be used in the same place as the base car (polymorphism) and it carries the same principle of being encapsulated so that all a new user needs to know to use it is how to create an instance of the UI and object types, and how to link them together.
Conclusion
I hope this overview of leveraging Object Oriented Programming in FactoryTalk Optix has been useful. It may seem complicated at first and perhaps more work than traditional HMI building strategies, but over time I promise that you will see massive efficiency gains in your development process, especially when you have to make updates. Stay tuned for the next installment, where I’ll explore tips and tricks for common pitfalls in FactoryTalk Optix.

